
Friday, February 15, 2013
My New Member
Please welcome the newest member to my blue room... A sewing machine! So thankful for my art teacher and friend from highschool gave it to me. I just picked her up from the shop where she got cleaned, tuned up and one new part! The nice elder man and ladies all said its a great sturdy machine that runs like new! Now, i need to remember the Lessons debbie taught me before hand surgery. Craftiness just a little more exciting for me!

"Sharpie" Mugs
I have an obsession with markers - it's true. Especially with sharpie markers. You walk in my blue room and you can see them all hanging by color in the cans. So, I'm always looking for new ways to use them. Now, all over Pinterest I've seen decorating mugs & bowls with sharpies. You get a mug. Take your favorite sharpie markers- decorate. Then you are to bake it in the oven at 350 for 30 minutes and poof a nice fun mug! Well... After a few hand washing the marker goes away and its not really permanent after all- bummer! I really like the simplicity of just creating with markers on a mug but knew there had to be a way to make it more permanent. So I did some digging around in my art books and thought back to my pottery days- duh!? Oil based markers! Or glass markers!! Sure enough I was correct and sorta solved the Pinterest fail.
So to make a cool hand drawn mug or bowl you will need:
- oil based sharpie markers OR glass markers (I like Decoart brand)
- ceramic or porcelain mug or bowl
- oven
- cookie sheet
1. Shake your makers really well and test them out on paper- remember these are oil based so super permanent
2. Plan out what you want to draw on your mug/bowl
3. Decorate and draw on your mug or bowl
4. Let them dry at least an hour
5. Place mugs/bowls on cookie sheet in COLD OVEN.
6. Turn oven on to 400 and set timer for 40min
7. Let mugs bake for 40min.
8. When timer goes off, turn oven off and let mugs cool in oven
9. You now have a personalized hand drawn mug or bowl!
*i have run my mug through the dishwasher on hot and it all stayed the same!
*Decoart markers colors all stayed the same while baking. However some of the oil based sharpie marker colors got a little darker.
Here are a few examples my sister an friend made with me the other day just before valentines.


So to make a cool hand drawn mug or bowl you will need:
- oil based sharpie markers OR glass markers (I like Decoart brand)
- ceramic or porcelain mug or bowl
- oven
- cookie sheet
1. Shake your makers really well and test them out on paper- remember these are oil based so super permanent
2. Plan out what you want to draw on your mug/bowl
3. Decorate and draw on your mug or bowl
4. Let them dry at least an hour
5. Place mugs/bowls on cookie sheet in COLD OVEN.
6. Turn oven on to 400 and set timer for 40min
7. Let mugs bake for 40min.
8. When timer goes off, turn oven off and let mugs cool in oven
9. You now have a personalized hand drawn mug or bowl!
*i have run my mug through the dishwasher on hot and it all stayed the same!
*Decoart markers colors all stayed the same while baking. However some of the oil based sharpie marker colors got a little darker.
Here are a few examples my sister an friend made with me the other day just before valentines.
Sunday, February 3, 2013
Hand surgery
On Thursday i had hand surgery and thankfully the surgery went well however I can't use my hand as much as I thought I could! Which has me bummed bc I don't think ill get to craft as much as I'd like too especially with Valentines Day around the corner! So, here's hoping I get creative by using my left hand and figure out ways to use what I can of my right hand :)


Tuesday, January 29, 2013
Valentines Banner
So, I love valentines day, it's one of my favorite holidays!! A day devoted to telling people you love them! Plus pink and sparkles! I recently made a quick little pennant banner to hang by my fireplace for valentines. It was super easy. I used my friends Cricut and punched out th letters. Cut burlap into triangles. Painted the edges with pink acrylic paint. Then strung it up with pink ribbon! I love how it turned out. When my entire mantle is decorated I will post pictures!


Saturday, January 26, 2013
Chalkboard Wine Glasses
I LOVE chalkboard paint! It's the school teacher in me and the artist in one medium, so fun. I have wanted to make wine glasses but never knew who or what for. Well my friend had her birthday and I thought they would make a cute gift, with a bottle of wine and some nice chalkboard pens. It took longer than expected and was a little tricker too. Drying the glasses was the hardest part making sure they dried evenly and with out any dried paint globs. I think they turned out great! Just remember...Once glasses are done, they should only be hand washed.


Tuesday, January 15, 2013
Cinnamon Roll Pancakes
I had been wanting to make these pancakes for a while, but they are so sweet and so NOT good for you that I felt like I needed to wait for a special occasion to make them. I decided that New Years Day was the occasion I had been waiting for and they turned out to be so good!
I had looked at several recipes for these and they are all kind of the same, just with a few tweaks here and there.
Before you start, you need to prepare all the components. So make a batch of your favorite pancake batter (I ALWAYS use Bisquick. I have a funny family story about that...I'll put it at the end of the recipe). Then mix up the cinnamon filling.
Cinnamon Filling:
1/2 stick unsalted butter, melted
1/4 cup plus 2 tablespoons packed brown sugar
1/2 tablespoon cinnamon
** this makes enough for pancakes for 2-3 people (i was making them for 5 people, so i doubled it)
Melt the butter, add the other ingredients and put in a zip lock baggie
Then make the glaze that goes on top of the finished pancakes:
1/2 stick butter (melted)
2 ounces room temperature cream cheese
3/4 cup powdered sugar
splash of vanilla extract
Over low heat melt the butter, mix in cream cheese, then stir in powdered sugar. set aside.
Now start making your pancakes. Add your batter to the pan. Let them cook until bubbles begin to form. Then take the zip lock bag with the cinnamon filling and snip the corner of the bag. Starting from the center of the pancake, squeeze out the filling in a swirl shape. Just keep the filling about a 1/4 inch away from the edge of the pancake. Cook for another 2 minutes or so (until the bubbles on the surface are popping) then flip the pancake over and cook till finished. Keep doing this until you run out of batter or filling.

When you serve the pancakes, drizzle a little bit of the glaze over the top of them.
These are SO sweet but SO good! Plan on 2-3 pancakes per person.
So my family are pretty loyal to Bisquick pancakes. My grandma (who is famous for her pancakes) swears by it. My Papa used to be a traveling salesman and as he would go on his sales route, he would stop in various restaurants. One restaurant's pancakes were, in his opinions, "heavy as lead balloons" and were clearly not made with Bisquick. My Papa asked to talk to the chef, told him his opinion of his pancakes and explained that using Bisquick would fix the problem. The next time my Papa ate there, they were using Bisquick to make their pancakes. :o)
When we were little, we'd ask my grandma to make our pancakes in different shapes (our initials, hearts, etc). With a bunch of hungry people around the table, she didn't have time to make all those shapes, so she would make normal circle pancakes and tell us they were planets, soccer balls, basketballs, golf balls, tennis balls, etc. Took us a while to catch on... :o)
I had looked at several recipes for these and they are all kind of the same, just with a few tweaks here and there.
Before you start, you need to prepare all the components. So make a batch of your favorite pancake batter (I ALWAYS use Bisquick. I have a funny family story about that...I'll put it at the end of the recipe). Then mix up the cinnamon filling.
Cinnamon Filling:
1/2 stick unsalted butter, melted
1/4 cup plus 2 tablespoons packed brown sugar
1/2 tablespoon cinnamon
** this makes enough for pancakes for 2-3 people (i was making them for 5 people, so i doubled it)
Melt the butter, add the other ingredients and put in a zip lock baggie
Then make the glaze that goes on top of the finished pancakes:
1/2 stick butter (melted)
2 ounces room temperature cream cheese
3/4 cup powdered sugar
splash of vanilla extract
Over low heat melt the butter, mix in cream cheese, then stir in powdered sugar. set aside.
Now start making your pancakes. Add your batter to the pan. Let them cook until bubbles begin to form. Then take the zip lock bag with the cinnamon filling and snip the corner of the bag. Starting from the center of the pancake, squeeze out the filling in a swirl shape. Just keep the filling about a 1/4 inch away from the edge of the pancake. Cook for another 2 minutes or so (until the bubbles on the surface are popping) then flip the pancake over and cook till finished. Keep doing this until you run out of batter or filling.
When you serve the pancakes, drizzle a little bit of the glaze over the top of them.
These are SO sweet but SO good! Plan on 2-3 pancakes per person.
So my family are pretty loyal to Bisquick pancakes. My grandma (who is famous for her pancakes) swears by it. My Papa used to be a traveling salesman and as he would go on his sales route, he would stop in various restaurants. One restaurant's pancakes were, in his opinions, "heavy as lead balloons" and were clearly not made with Bisquick. My Papa asked to talk to the chef, told him his opinion of his pancakes and explained that using Bisquick would fix the problem. The next time my Papa ate there, they were using Bisquick to make their pancakes. :o)
When we were little, we'd ask my grandma to make our pancakes in different shapes (our initials, hearts, etc). With a bunch of hungry people around the table, she didn't have time to make all those shapes, so she would make normal circle pancakes and tell us they were planets, soccer balls, basketballs, golf balls, tennis balls, etc. Took us a while to catch on... :o)
Thursday, January 3, 2013
The "Blue Room"
So, third room started out as a office... Then came the crafts... Thus it became the office/craft room. Well, if you also open the closet it has more crafts BUT it has my bags and clothes as well so it's now just being called "the blue room" I love the blue room! It's also bright in there bc of the windows and gets tons of light. I have been spending lots of time in it which is great. Well, I feel as though the room is pretty much organized as much as it can be. Here are the latest pictures of the peg board, which is next to my computer which also doubles as the TV. I took these pictures while Sitting on opposite side. i also finished reorganizing the back of the door organization as well! When I look at it just makes me smile. So colorful! Organized! Fun things!


Monday, December 31, 2012
Button flowers
I love buttons! There is something so fun about them all the different sizes, shapes, colors ect.. I have lots of buttons! Especially white ones, so today I thought I would make something for my sister to keep at work and thought a little flower bouquet of buttons would be cute. They are very easy to make and I think look adorable.


Saturday, December 29, 2012
MistleToes
For the holiday season Jess & I got crafty! Couldn't post this until after Christmas. Jess had the great idea to make cute plates for "the grands". It was super easy and fun - even Ry enjoyed it.
Materials:
White Dinner Plates
Sharper Makers
Acrylic Glass Paint
Nail polish Remover
Sponge brushes
Oven


Materials:
White Dinner Plates
Sharper Makers
Acrylic Glass Paint
Nail polish Remover
Sponge brushes
Oven
Tuesday, December 18, 2012
English Muffin Bread
I love homemade bread. The problem is that I really don't like making homemade bread. Usually I solve this problem by just enjoying my mom or my sister Christy's homemade bread. They make some delicious ones! (Seriously - you should check my sister's blog for some ideas). But, I had a friend who had recently had a baby and instead of bringing a meal, I wanted to bring some muffins, scones and breads to put in her freezer so she'd have something easy to grab for breakfast. (When I had Riley, people brought us dinners, which is a huge help and I was so thankful, but I never knew what to do for breakfast when I didn't have time/was too tired/decided to shower instead of eat/etc. and found myself eating some strange things for breakfast.) I felt bad trying to get my mom or sister to make some breads for me to bring my friend so I decided to just suck it up and do it myself.
The part of bread making that I don't like is all the steps. I get a little intimidated using yeast. I don't like waiting for dough to rise. I get confused with where I am in the process. Thankfully I found this recipe for English Muffin Bread. It was super easy, cheap to make, only used one bowl and made 4 loaves.
I found the recipe on The One Good Thing by Jillee Blog. If you want to see pictures of what it looks like, head on over to her blog. Be sure to grease the pans very well and don't cut it until it's completely cooled! This made 4 loaves. It has all the nooks and crannys that English muffins do (hence the name) and tastes best toasted. It was good with jam or jelly but I liked it best with butter and honey. Here is the recipe...
The part of bread making that I don't like is all the steps. I get a little intimidated using yeast. I don't like waiting for dough to rise. I get confused with where I am in the process. Thankfully I found this recipe for English Muffin Bread. It was super easy, cheap to make, only used one bowl and made 4 loaves.
I found the recipe on The One Good Thing by Jillee Blog. If you want to see pictures of what it looks like, head on over to her blog. Be sure to grease the pans very well and don't cut it until it's completely cooled! This made 4 loaves. It has all the nooks and crannys that English muffins do (hence the name) and tastes best toasted. It was good with jam or jelly but I liked it best with butter and honey. Here is the recipe...
5 1/2 cups warm water
3 packages RAPID RISE yeast
(Update: You can use regular yeast, but you will need to let is rise TWICE. Once in the bowl, til it reaches the top…and then again in the pans, til it reaches the top. With the RAPID RISE you only need to let it rise once in the pans.)
2 Tablespoons salt
3 Tablespoons sugar
11 cups all purpose flour (you can use bread flour as well)
3 packages RAPID RISE yeast
(Update: You can use regular yeast, but you will need to let is rise TWICE. Once in the bowl, til it reaches the top…and then again in the pans, til it reaches the top. With the RAPID RISE you only need to let it rise once in the pans.)
2 Tablespoons salt
3 Tablespoons sugar
11 cups all purpose flour (you can use bread flour as well)
Mix altogether, then spoon into (4) well greased loaf pans. Let rise in pans until dough reaches the top of the pans, and bake in 350 degree oven for 45 minutes or until golden brown.
10 minutes before done, brush with melted butter. Makes 4 loaves. Bread
will be moist at first. Allow to COOL COMPLETELY before cutting. Makes
terrific toast.
Enjoy!
Monday, December 17, 2012
Holiday Wreath
I decided to FINALLY get a new wreath up on my front door. I don't really have extra money to go buy a nice real pine wreath with a big read bow like I usually do, so I went the crafty way.
 |
| You will need a wreath and some yarn-i used my friend Kaits extra read yarn. |
 |
| Tie a know around the wreath, and you simple wrap the yard around it keep it nice and tight. Now i struggled hacing this HUGE ball of yarn so I broke it down into smaller chunks, which really helped |
 |
| I made small little balls of yarn by wrapping it around my fingers. This made it a lot easier and faster to wrap around the circle wreath. |
 |
| When I got the end of the yarn, I just tied the two ends together and continue to wrap. |
 |
| Cover the entire wreath by wrapping it with yarn, you can make the wreath thicker by adding more yarn around the wreath. |
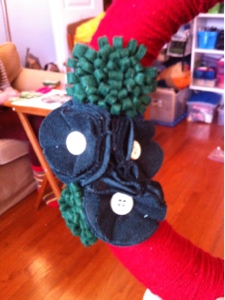 |
| I then made some green felt and velvet flowers and attached to the wreath. |
 |
| Finished product! |
Monday, December 10, 2012
Roasted Veggie Tacos
I love tacos. Lately I've been trying to be more creative than the normal chicken or beef tacos. I saw a recipe for roasted vegetable tacos on a website and adapted it a bit.
I diced a summer squash, a zucchini, a red pepper and a red onion into large chunks and then tossed them in a couple tablespoons of olive oil, a large pinch of salt, 2 teaspoons of cumin and 4 cloves of minced garlic. I then put all the veggies on a baking sheet and roasted them in a 400 degree oven for about 25 minutes (until they were tender and starting to brown).
While they were roasting I mashed together an avocado, a pinch of salt and 1/2 cup plain greek yogurt until it was creamy. (just use a fork to mix these. i tried it in the blender and it would have been much easier just to do it by hand!)
I also heated up a can of black beans on the stove.
Then I warmed up some corn tortillas in a skillet (wrap them in a clean dishtowel to keep them warm) and shredded up some monterey jack cheese.
When the veggies are done, you just assemble your tacos. A big scoop of veggies, a spoonful of black beans, a good drizzle of the avocado cream and then some of the shredded cheese.
These were SO good. I should have used more veggies because Kirk and I could have each had another taco or two!
I diced a summer squash, a zucchini, a red pepper and a red onion into large chunks and then tossed them in a couple tablespoons of olive oil, a large pinch of salt, 2 teaspoons of cumin and 4 cloves of minced garlic. I then put all the veggies on a baking sheet and roasted them in a 400 degree oven for about 25 minutes (until they were tender and starting to brown).
While they were roasting I mashed together an avocado, a pinch of salt and 1/2 cup plain greek yogurt until it was creamy. (just use a fork to mix these. i tried it in the blender and it would have been much easier just to do it by hand!)
I also heated up a can of black beans on the stove.
Then I warmed up some corn tortillas in a skillet (wrap them in a clean dishtowel to keep them warm) and shredded up some monterey jack cheese.
When the veggies are done, you just assemble your tacos. A big scoop of veggies, a spoonful of black beans, a good drizzle of the avocado cream and then some of the shredded cheese.
These were SO good. I should have used more veggies because Kirk and I could have each had another taco or two!
Saturday, December 8, 2012
kids crafts
Today my niece and nephew came over and we had low key Christmas Crafts time. It was a lot of fun, especially since I wasnt feeling too good it was easy enough for me to sit and tell them what to do and they just had fun doing it!
 |
| Tissue Paper Snow Man: black construction paper, glue and tissue paper |
 |
| Crumple of little bits of tissue paper to make little "balls" |
 |
| draw three circles on paper and fill it with the little crumpled up pieces of tissue paper |
 |
| We added google eyes and a nose, then after i took the picture added more "snow" around the snowman |
 |
| BUTTON SNOWFLAKES |
 |
| Have a wide variety of white buttons! |
 |
| Using three popsicle sticks and wood glue, glue the sticks together. |
 |
| Using the the glue on sticks, glue on white buttons on the sticks! If you want, you can even add a little glitter. |
 |
| SOCK PUPPETS! |
 |
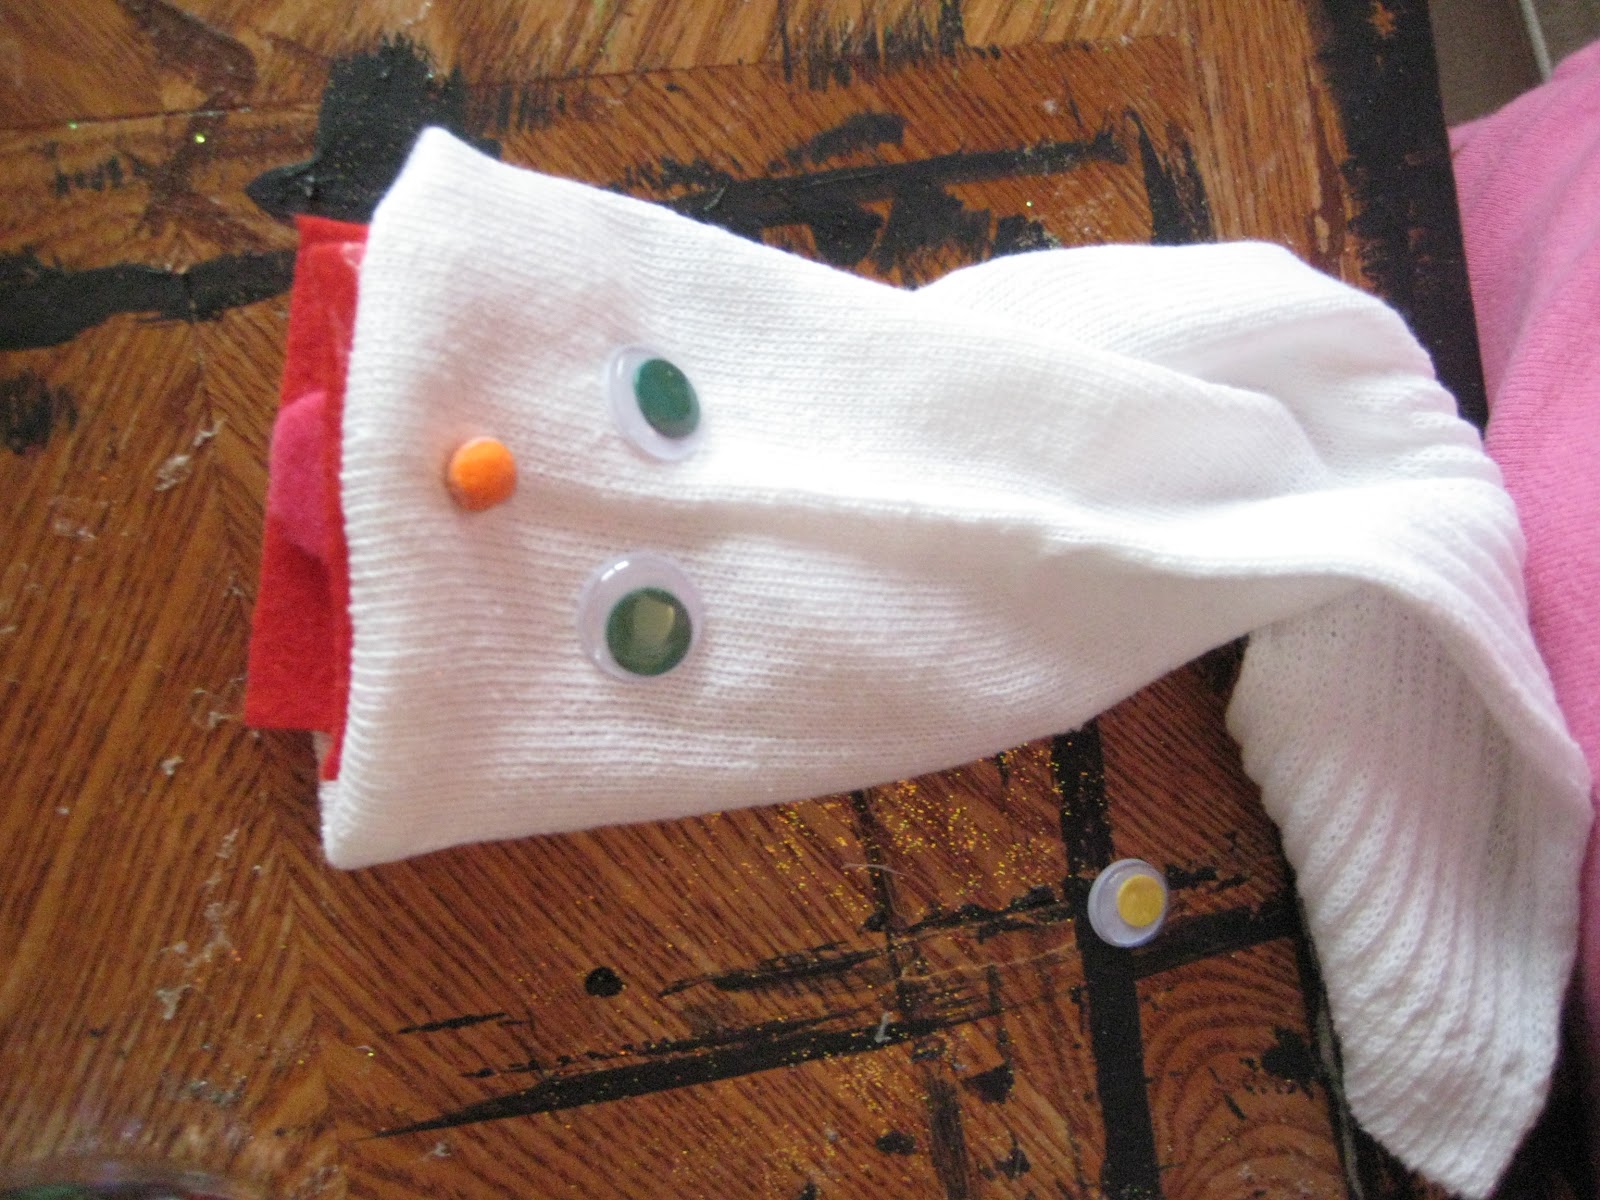
| White sock, red felt, pink felt, google eyes and buttons or sequins |


Subscribe to:
Posts (Atom)